Thursday, October 27, 2011

One Skillet "Cowboy" Cookie

I think it's probably a fair call to say this recipe was a FAIL for me.  But then again, can you really say that something that at least resembles and tastes like a chocolate chip cookie is a failure?  Exactly.

I saw a recipe for a one-skillet chocolate chip cookie.  The seeming ease of it all was too much to resist.  I call mine a "Cowboy" Cookie, because preparing it in a cast-iron skillet reminds me of the cowboy biscuits you encounter on trail rides, roundup breakfasts, etc.  If you have no idea what I'm referring to, well, you're not from Texas, and just disregard. :)
DSC_2901.NEF

 One-Skillet "Cowboy" Cookie
recipe adapted from here

 Ingredients
  • 1 stick (8 tablespoons) unsalted butter
  • 1/2 cup granulated sugar
  • 1/2 cup light brown sugar
  • 1 teaspoon pure vanilla extract
  • 1 egg
  • 1 1/2 cups unbleached all-purpose flour *I substituted whole wheat
  • 1/2 teaspoon baking soda
  • 1/4 teaspoon kosher salt
  • 1 cup semi-sweet chocolate chips
Directions

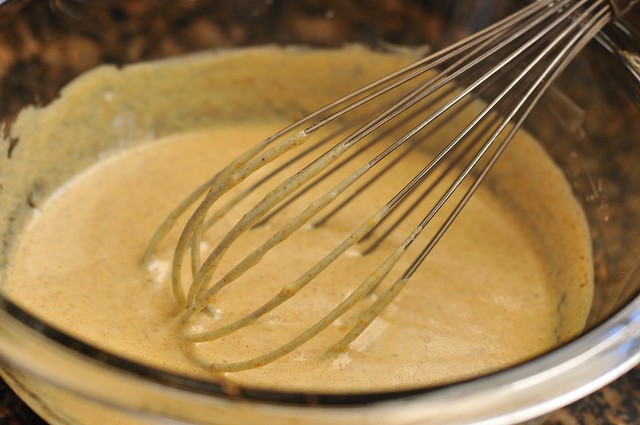
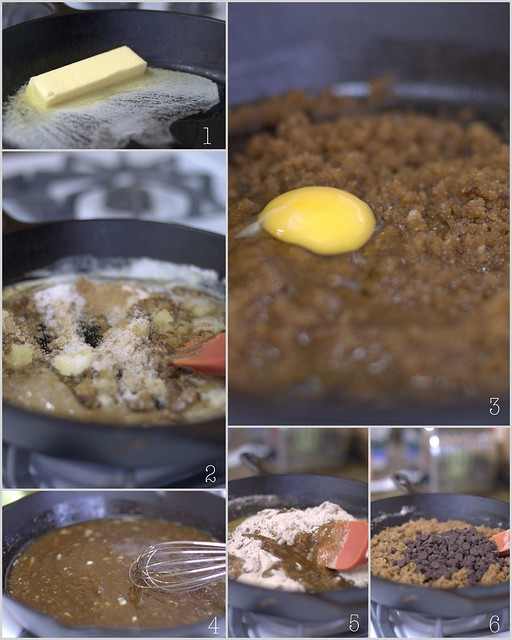
1. Preheat oven to 350 degrees. Melt butter in a cast iron skillet set over medium-low heat. Stir in sugars and vanilla and remove from heat. Let rest until pan is warm, but no longer very hot, about 5 minutes.

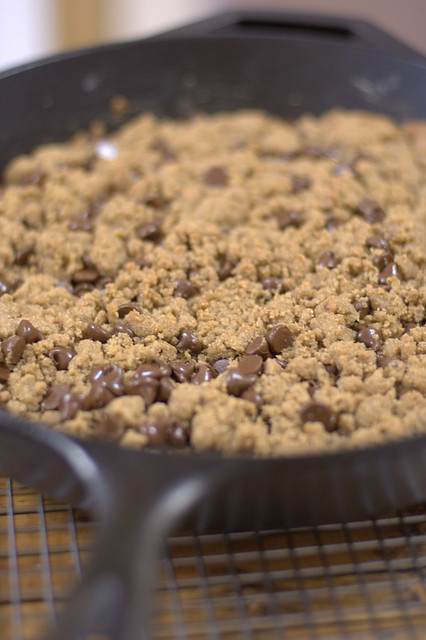
2. Crack an egg into the butter and sugar mixture*, and whisk it well into the mixture. Place flour, baking soda, and salt on top, and very carefully stir into the mixture until smooth and well-mixed. Stir in chocolate chips. Place in the oven for 15 minutes, or until starting to turn golden on the top and around the edges, but soft in the center.
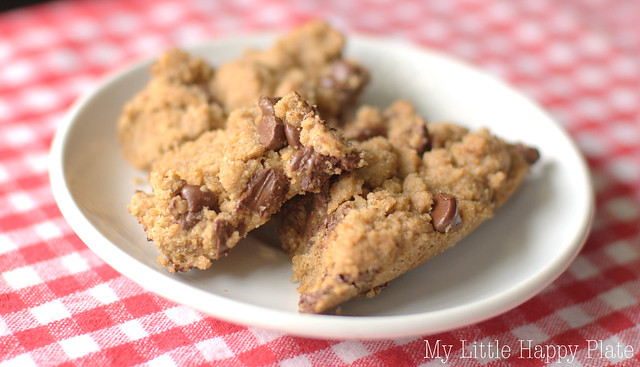
Food


Easy enough, right? 
DSC_2899.NEF

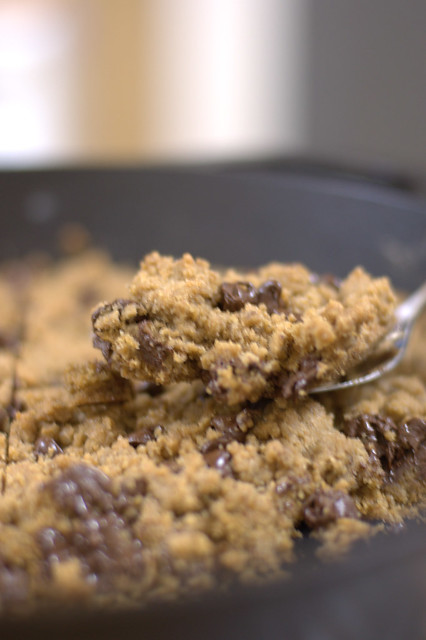
Here's why I say mine was a bit of a fail:  mine was very dry and crumbly. 
Can you tell?
DSC_2900.NEF

 I think I can attribute this to two possible things:
1)  The butter here in Brazil is sold in a 500 g block, roughly two of our sticks.  However, instead of converting the stick-to-gram ratio exactly, I "guesstimated" on a stick of butter, and it may have been a little short.
2)  I used whole wheat flour.  I know, I know...it's a chocolate chip cookie for Lawd's sake, but I just sort of go on autopilot about substituting whole wheat for processed white - to increase the fiber in a baked good.  You know, for my kids... ;)  Anyway, it certainly made the cookie "grittier," and possibly drier to boot.

*Another Tip*
Although the recipe tells you to let the skillet cool a bit before adding the egg, I suggest tempering the egg by letting it sit atop your warm stove before putting it in the batter.  I had bits of cooked egg floating in my batter because the skillet/batter were still too warm for the egg.  Boo.
Next time, I'll stick to the original recipe, and see what happens.  Really, though, with a big glass of milk, does this look so bad?


DSC_2904.NEF

Saturday, October 22, 2011

Brunch Delight Part I: Creamy Carrot Soup

I recently hosted a brunch for my Book Club.  Despite the fact that we've moved into the South American "Spring," our weather has been drizzly and cool, so I was all about a comfort food menu.  Naturally, soup came to mind, but I wanted something pure and essential in flavor.  You could not ask for a simpler and tastier soup than this Creamy Carrot - I promise.

DSC_2866.NEF

Creamy Carrot Soup
 Servings:  4-6
Ingredients (don't get too overwhelmed):
  • 4 cups Carrots, sliced (about 6-7 carrots)
  • 1 Onion, chopped
  • 2 Tablespoons Butter
  • 5 cups Milk (I used whole)
  • Pinch of salt and pepper
Directions (so simple, there's not pictorials):
  • Clean* and slice all the carrots
  • Chop the onion
  • In a Dutch Oven, sauté the carrots and onion in the butter for about 10 minutes 
  •  Add the milk, salt and pepper, and let simmer for about 30 minutes
  • Pour contents into a food processor or blender and puree until smooth.   *You might need to do this in a couple of batches. 
  • Garnish with a touch of cream, if desired and serve warm
*Tips*
*  I never peel my carrots.   A good majority of the vitamins and minerals in a carrot lie just beneath the skin.  Peeling can remove a lot of that goodness.  Instead, I scrub carrots with soap and water to remove any dirt or residue.
*  The original recipe I used suggested straining the soup after pureeing, however, I found it unnecessary.  Besides, I didn't want to strain out all that good veggie fiber!

    I know this is one I'll come back to time and again for its elegant simplicity.
    DSC_2862.NEF
    Recipe adapted from here

    Saturday, October 15, 2011

    Killer Pumpkin Cheesecake Muffins

    It's probably a misnomer to call these "muffins," as they are much more like cupcakes in their similarity to dessert. And, I say "Killer" because they are likely to a) Kill your waistline and b) Torture you with the sight and smell of them. They are THAT good.

    I took the recipes of two ladies, and did my own little tweak...you'll see....
    DSC_2793

    Pumpkin Cheesecake Muffins
    Muffin and Topping adapted from: Annies Eats and Sugar Cooking
    Makes 12 regular-size muffins

    There's three main steps to this recipe: Cream-cheese filling, muffin base, and crumb topping. Sound rich enough for ya?

    For the filling:
    • 8 oz. cream cheese, softened
    • 1 large egg
    • 1 tbls flour
    • 1 cup confectioners’ sugar

    For the muffin base:

    • 1 1/2 cups all-purpose flour *I substituted whole wheat flour (because that somehow balances all the sugar in my mind)
    • 1/2 tsp. ground cinnamon*
    • 1/2 tsp. ground nutmeg*
    • 1/2 tsp. ground cloves*
    • 1/2 tbsp. plus 1/2 tsp. pumpkin pie spice*
    • *I didn't have cloves or pumpkin pie spice on hand, so I used 1 1/2 tsp ground cinnamon + the nutmeg - the flavor might be a tad more delicate, but we didn't mind
    • 1/2 tsp. salt
    • 1/2 tsp. baking soda
    • 2 large eggs
    • 1 cup sugar
    • 1 cup pumpkin puree
    • 1/2 cup + 2 tbls vegetable oil

    For the topping:

    • 1/4 cup sugar *I subbed in brown sugar - just my preference for something I want to taste "warm and cozy"
    • 2 1/2 tbsp. flour
    • 3/4 tsp. ground cinnamon
    • 2tbsp. cold unsalted butter, cut into pieces
    Directions:
    1. To prepare the filling, combine the cream cheese, egg, flour and confectioners’ sugar in a medium bowl and mix well until blended and smooth. Set aside.
    2. To make the muffins, preheat the oven to 350˚ F. Line muffin pans with paper liners. In a medium bowl, combine the flour, cinnamon, nutmeg, cloves, pumpkin pie spice, salt and baking soda; whisk to blend.
    3. In the bowl of an electric mixer combine the eggs, sugar, pumpkin puree and oil. Mix on medium-low speed until blended.
    4. With the mixer on low speed, add in the dry ingredients, mixing just until incorporated.
    5. To make the topping, combine the sugar, flour and cinnamon in a small bowl; whisk to blend. Add in the butter pieces and cut into the dry ingredients with a pastry blender or two forks until the mixture is coarse and crumbly. Transfer to the refrigerator until ready to use.
    6. To assemble the muffins, fill each muffin about 2/3 full with batter. Add a dollop of filling on top. Sprinkle with topping. Bake for 14-16 minutes, or until toothpick comes clean. *The cream cheese filling might keep the top of the muffin a bit too gooey, so they might need an extra couple of minutes of bake time.
    Pumpkin cheesecake muffins process

    What happens when your toddler is kept at bay from warm, gooey muffins so Mommy can photograph...
    DSC_2781

    Don't worry, she won.

    DSC_2779

    Nutrition Round-Up:
    1) Uh...well, there's Pumpkin in them....Pumkin is a good source of Vitamins A & E
    via here
    Can't say I didn't warn you!

    Sunday, October 9, 2011

    Meatless Monday: Stuffed Zucchini

    I almost skipped Meatless Monday last week, as Ben was out of town, and the girls couldn't care less whether we go meatless or not. However, I remembered seeing an image of stuffed zucchini on Pinterest that looked promising (you should follow my food board, here). Most importantly for me, it was easily adaptable, so I went for it. There was also a *kid-pleasing* presentation option I was hopeful about. *Be sure to read my Recipe Tips at the end of the post!*

    DSC_2689
    recipe heavily adapted from here

    Preheat your oven to 400 degrees F.
    To make the stuffed zucchini "boats," you first need to carve out the hull of the zucchini. To do that, cut the squash lengthwise...
    DSC_2666

    Then, using a spoon or melon baller, scoop out the flesh. Don't toss it, though! It goes into the filling later. Place the squash in a lightly buttered for oiled baking dish.
    DSC_2670

    What you fill the zucchini with is entirely up to you, and this is where I did my own variation using Texturized Soy Protein ("TSP")

    DSC_2664

    TSP is a soy product made to resemble meat in texture. It's what soy burgers are made of, but also comes in a dried version that is easily reconstituted to a spongy protein source. It also acts like its sister product, tofu, in that it takes on the flavor of whatever it is cooked with, so it's very versatile.

    DSC_2674

    For the remainder of the filling I used:
    • the scooped zucchini flesh - chopped
    • 1 carrot, chopped
    • 1/2 onion, chopped
    • 1 clove garlic, minced
    • 1/2 tomato, seeded and diced
    • 1/4 cup red bell pepper, diced
    • 1/4 cup Italian parsley, chopped
    • 1/2 teaspoon Mexican oregano
    • Salt & Pepper to taste
    • Cheese, shredded to taste for topping
    While the TSP soaks, cook the onion and carrot with olive oil until they begin to soften - about 10-15 minutes.
    DSC_2671

    Next, add the garlic, tomato, red pepper and drained TSP (Be sure to follow package directions) Let the veggies and soy cook on med-low for about 10 more minutes, stirring to blend flavors.
    DSC_2676

    Spoon the mixture into the zucchini boats, and sprinkle the top with parsley for added color and flavor.
    DSC_2679

    Place in the oven for 15 minutes. Sprinkle tops with shredded cheese, then return to oven, and turn on broiler to melt the cheese - about 5-7 minutes.

    I played up the "boat" aspect of the zucchini for Avery, complete with sail and "water" salad. She was mildly amused. :/
    DSC_2680

    Nutrition Round-Up
    • This recipe is low calorie and low fat
    • If you use TSP, it is a good source of a low-fat, complete protein
    • Using Carrots, Onions, Bell Pepper and Tomato (as well as the zucchinis themselves!) makes this recipe a good source of dietary fiber and nutrients such as Beta Carotene and Vitamin C.
    *Recipe Tips for the next time I make this*
    1. The zucchini was a little too raw/crisp for me. If you're trying to eat at least a percentage of raw food, I think this version will suffice, but for my family, next time I'll either steam or parboil the zucchini before filling it.
    2. The recipe I went by called for the mixture to include sour cream. Sour cream doesn't exist in Brazil, so I skipped it, but the mixture definitely could've used some kind of binder and/or richener. Next time, I'll use either a soft cheese or plain yogurt to add a bit more richness.
    3. Going back to the hearty-ness factor, this recipe was lacking. I'm pretty sure I was hungry again within an hour or so, and likely had a bowl of cereal as my nightcap! It might be better served as a side dish....
    DSC_2683

    Wednesday, October 5, 2011

    On the Grill: Tandoori Pork Tenderloin

    By the time the weekend rolls around, we're ready to take our cooking outdoors to the grill. Something about a man and his need to cook meat over an open flame...I won't go into any analysis on that, I just enjoy the results! I grew up on Texas BBQ, and still relish that distinct, smokey perfection, but for our life down here, we add a little global flavor into the mix whenever we can. Hence, last weekend's flavor extravaganza: Tandoori Pork Tenderloin with Butternut Basmati and Grilled Canela Pineapple.
    DSC_2649

    Did I mention it was DEE-vine? See, I can gush like that, because I really had little to do with it. Ben suggested we try the Tandoori Marinade, so I whipped it up.
    DSC_2634

    Tandoori Marinade (from The All New Joy of Cooking)
    • 1 cup plain yogurt
    • 2-3 Tablespoons vegetable oil
    • 2 teaspoons finely minced garlic
    • 2 teaspoons grated fresh ginger
    • 1 teaspoon ground coriander
    • 1 teaspoon ground cumin
    • 1 teaspoon ground red pepper
    • 1/4 teaspoon cinnamon
    • 1/4 teaspoon curry
    • 1/2 teaspoon salt
    The aromas from all the spices were intoxicating. Avery, my four year-old (aka sous chef) was very intrigued to know the name and scent of each one. But the key, KEY ingredient in this marinade is the yogurt (plain, whole milk) - especially since pork tender is a very lean cut of meat. It would also work very well with chicken. The yogurt seems to form a protective seal between the meat and the flame - locking in the natural juice. Overcooked, dry pork = sad face.
    Grilled to perfection. (Again, all Ben)

    DSC_2635

    I had some Basmati rice already made (probs leftover from the Orange Chicken), but I wanted to get a bit more veggie in there, so I steamed some fresh butternut squash, and mixed it in. In Brazil, it is not uncommon for restaurants, especially churrascarias (à la Fogo de Chao) to serve grilled pineapple. The natural enzymes in the fresh fruit aid in digestion, presumably a good thing after a large consumption of meat. That's how we discovered Grilled Pineapple with Canela (Cinnamon).
    It is. By far. One of the tastiest treats I've come across in Brazil. I won't go on and on, just trust me. Try it.
    DSC_2645
    Oh, and try the Tandoori Marinade, too - it's da bomb!

    Sunday, October 2, 2011

    Meatless Monday: Bulgar Taco Salad with Cilantro-Lime Dressing

    It's been really amazing to me that Meatless Monday has become something my family (well, OK, maybe just Ben) looks forward to. I can count on him asking, "So, what's for Meatless Monday?" when he walks in the door. Keeps me on my toes to find appealing recipes!

    I've had a bag of dry bulgar wheat in the pantry, and have been wanting to work with it, so I looked up recipes, and found one for Bulgar Taco Salad. I happened to have the other ingredients on hand as well, so it was an easy decision.
    DSC_2539
    recipe adapted from Get Natured

    If you've not tried Bulgar, you really should add it to your grain repertoire. When cooked, it is a chewy, dense grain that actually works very well in a meat-substitute dish.

    DSC_2508

    To make the salad, you'll need:
    • 1/2 cup dry bulgar wheat
    • 1 15 oz can black or pinto beans, rinsed well **I used dark red kidney beans
    • 1/2 cup corn
    • 2 green onions, chopped
    • 1 medium tomato, chopped
    • 1 avocado, diced
    • 4 cups lettuce **I used Boston/Butter lettuce, but it's really just a personal preference, just don't use Iceberg, please! ;)
    DSC_2507
    1. Place 1 cup of water and the dried bulgar in saucepan, bring to a boil. Reduce heat, cover, and simmer until the water has been absorbed, and grain is tender (about 12-15 minutes). Uncover and let cool. *I boiled my bulgar in vegetable broth to up the flavor.
    2. Combine bulgar, beans, corn, green onions, and tomato.
    Cast of Characters for the dressing
    DSC_2512

    Cilantro-Lime Dressing
    • Juice of 1 lime
    • 2 tbsp olive oil
    • 1/4 cup cilantro, packed
    • 1 tsp agave nectar or honey
    • 1/4 tsp chipotle chili powder (adjust to desired level of spice)
    • 1/4 tsp ground cumin
    • 1/4 tsp coriander
    • 1/2 tso Mexican oregano
    • 1 clove of garlic, minced
    • 1/4 tsp sea salt
    Mix well, and add to the bulgar/veggie mix. Stir well to coat all the veggies.
    Serve bulgar mix atop a bed of the lettuce, and top with diced avocado.

    Nutrition Round-Up
    * The bulgar wheat and kidney beans are great sources of protein, iron and fiber
    * Tomatoes pack an antioxidant punch
    * Avocados are good sources of fiber, folate, and Vitamin K, as well as Monounsaturated fat
    info via here

    Saturday, October 1, 2011

    Not your Typical Take-Out: Orange Chicken

    Last week, I set out to make a dish I'd never before eaten: Orange Chicken. Or, if you want to put on your Chinese accent, "O-hange Sheek-un." Although I do enjoy most Asian cuisine, I've never been tempted to order the typical dish that included questionable cuts of meat, fried, then smothered in an unnaturally-colored sauce.
    Soooo....why, would I want to try the recipe, you ask? Well, this one actually sounded...good!

    DSC_2556

    You do still fry the chicken, and cover it in a savory-sweet sauce, but I feel certain I can guarantee this is far better than any take-out in a box.

    Start with about 2 lbs boneless, skinless chicken breasts (or thighs), and cut them into 1 1/2" cubes.
    DSC_2549

    Prepare the Orange Sauce:
    • 1 1/2 cups water
    • 1/4 cup orange juice
    • 1/3 cup rice vinegar
    • 2 1/2 Tablespoons soy sauce
    • 1 Tablespoon orange zest, grated
    • 1/2 - 1 cup packed brown sugar (I used 1/2 cup)
    • 1/2 teaspoon ginger root, grated
    • 1/2 teaspoon garlic, minced
    • 2 Tablespoons green onion
    • 1/4 teaspoon red pepper flakes
    • 3 Tablespoons cornstarch (reserve for later)
    • 2 Tablespoons water
    In a large saucepan, combine 1 1/2 cups water, orange juice, rice vinegar and soy sauce. Blend well over medium heat for a few minutes. Stir in brown sugar, zest, ginger, garlic and red pepper flakes. Bring to a boil, then reduce heat, and let simmer while you fry the chicken.

    Prepare three dishes for your batter and breading. For it, you'll need:
    • 1 1/2 cups corn starch
    • 1 cup panko (Japanese) bread crumbs
    • 2 eggs, beaten
    • 1/4 teaspoon salt
    • 1/4 teaspoon pepper
    • Oil (I used canola)
    In one dish, combine starch, salt and pepper. In the next, put the beaten eggs. In the last, the panko. Working assembly line-style, dip the chicken in the eggs. Then dredge in the corn starch. Dip again in the eggs, and finally, in the panko. This double-dredging method makes for a nice, crunchy batter than will hold up to the coating of the sauce.

    Place chicken (in batches) in a single layer in a frying pan with the oil heated to 375 degrees. Here's where it's good to know your range, and when oil hits ideal frying temperature. I started frying before my oil was hot enough, and my first batch of chicken was only slightly golden. However, I over-adjusted, and my second batch was a little too brown.
    DSC_2550
    Somewhere along the way, I got it just right.

    Keep chicken warm in a low oven while you prepare side dishes. I served Basmati rice and lightly-sauteed broccoli.

    Shortly before serving, combine 3 tablespoons of cornstarch with 1 cup of cool water and mix thoroughly. Slowly stir mixture into orange sauce until it thickens. Pour sauce over breaded chicken, and garnish with green onions. Ben and I kicked it up with Sriracha hot sauce, and I think it was a perfect addition, but for the kiddos, we kept it mild.
    DSC_2559

    Now THAT was an Orange Chicken I could order up!

    Recipe adapted from TheNoshery